
Frosted glass can add a touch of elegance and privacy to your home without sacrificing natural light. You might think achieving this effect requires special tools or chemicals, but there's a simple, eco-friendly way to do it using baking soda! This easy DIY project can be applied to various glass surfaces, such as windows, glass doors, mirrors, and even glassware.
In this article, we'll guide you through the process of creating a frosted glass effect using baking soda. We'll cover the materials you'll need, step-by-step instructions, and tips for the best results.
Advertisement
Materials Needed

Before you get started, gather the following materials:
Glass Surface: This could be a window, glass door, mirror, or even glass jars and vases.
Baking Soda: A fine, powdery substance that's gentle but effective.
Water: To create a paste with the baking soda.
Sponge or Soft Cloth: For applying the paste.
Painter's Tape: To mask off areas you don't want frosted.
Old Newspapers or Drop Cloth: To protect surrounding areas.
Spray Bottle (Optional): For misting the glass with water before applying the baking soda.
Stencils or Tape (Optional): If you want to create patterns or designs.
Surfaces You Can Frost
This technique works best on smooth, clean glass surfaces. Here are some ideas:
Windows: Add privacy to bathroom or bedroom windows.
Glass Doors: Perfect for shower doors or patio doors.
Mirrors: Create a frosted border or pattern for a decorative touch.
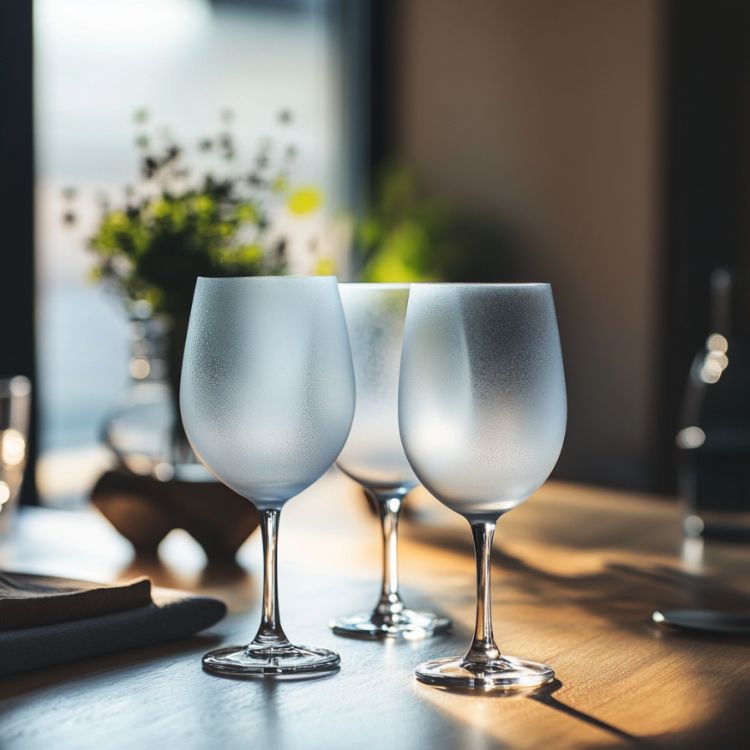
Glassware: Customize jars, vases, or glass containers.
Picture Frames: Frost the glass of a picture frame for a unique look.
Glass Doors: Perfect for shower doors or patio doors.
Mirrors: Create a frosted border or pattern for a decorative touch.
Glassware: Customize jars, vases, or glass containers.
Picture Frames: Frost the glass of a picture frame for a unique look.
Step-by-Step Instructions
Clean the Glass Surface:
Start by thoroughly cleaning the glass surface you plan to frost. Remove any dust, grease, or fingerprints using a glass cleaner or a mixture of vinegar and water. Make sure the glass is completely dry before proceeding.
Prepare the Area:
Lay down old newspapers or a drop cloth to protect the surrounding area from spills or drips. If you're working on a window or glass door, use painter's tape to mask off the edges or any areas you don't want frosted. If you're creating a specific design, now is the time to apply stencils or use tape to outline the pattern.
Mix the Baking Soda Paste:
In a small bowl, mix baking soda with a small amount of water until it forms a thick, spreadable paste. The consistency should be similar to toothpaste—thick enough to stick to the glass without running.
Apply the Baking Soda Paste:
Using a sponge or soft cloth, apply the baking soda paste to the glass surface. You can either spread it evenly for a uniform frosted effect or dab it on for a textured look. For larger areas, work in sections to ensure the paste doesn't dry out before you're finished.
Let It Sit:
Allow the baking soda paste to sit on the glass for about 10-15 minutes. The longer it sits, the more pronounced the frosted effect will be. However, avoid letting it dry completely as it may become difficult to remove.
Rinse and Reveal:
After the paste has set, rinse it off with water or wipe it away with a damp cloth. If you used stencils or tape, carefully remove them to reveal your design. You should see a beautiful frosted effect where the baking soda was applied.
Final Touches:
Wipe the glass with a clean, dry cloth to remove any remaining residue. If needed, you can repeat the process for a more intense frost or touch up any areas that need more coverage.
Final Looks

Tips for Best Results
Experiment with Patterns: Use stencils or tape to create geometric shapes, borders, or custom designs. You can also try using lace or mesh as a stencil for a delicate, intricate pattern.
Test on a Small Area: Before applying the paste to a large surface, test it on a small, inconspicuous area to ensure you like the effect.
Control the Opacity: The thickness of the baking soda paste and the duration it sits on the glass will affect the opacity of the frost. Adjust these variables according to your preference.
Easy Removal: If you ever want to remove the frosted effect, simply clean the glass with a mixture of water and vinegar or a glass cleaner. The baking soda will wipe away, leaving the glass clear again.
Additional Ideas
Additional Ideas
Frosted Glassware Gifts: Customize glass jars, vases, or drinking glasses with frosted designs and give them as thoughtful, handmade gifts.
Privacy Film Substitute: Use this method on windows where you need privacy but still want to let in light. It's an affordable and temporary alternative to privacy films.
Privacy Film Substitute: Use this method on windows where you need privacy but still want to let in light. It's an affordable and temporary alternative to privacy films.
Creative Art Projects: Combine the frosted effect with glass paint or markers to create unique decorative pieces.
Advertisement
This baking soda method is a simple, eco-friendly way to achieve a frosted glass look without spending a lot of money or using harsh chemicals. Whether you're looking to add privacy to a room, create unique decor, or just try something new, this DIY project is both fun and rewarding. So grab your baking soda and get started on your frosted glass masterpiece!