Holiday decorations can often become repetitive and predictable, but creating a unique centerpiece can elevate your festive decor to a whole new level. This DIY project transforms simple Dollar Store candy canes and a foam cone into an eye-catching statement piece. It’s budget-friendly, easy to assemble, and adds a sweet, whimsical touch to your holiday table or mantel. Perfect for those who love to infuse their homes with homemade charm during the holiday season.
This candy cane centerpiece can be styled beautifully in a rustic or minimalist home setting. Place the centerpiece on a wooden tray with some evergreen sprigs and red berries for a cozy, farmhouse look. For a more modern approach, display it on a sleek, white table with silver or gold accents surrounding it. Consider pairing with candles or fairy lights to add a warm glow that complements the occasion.
Advertisement
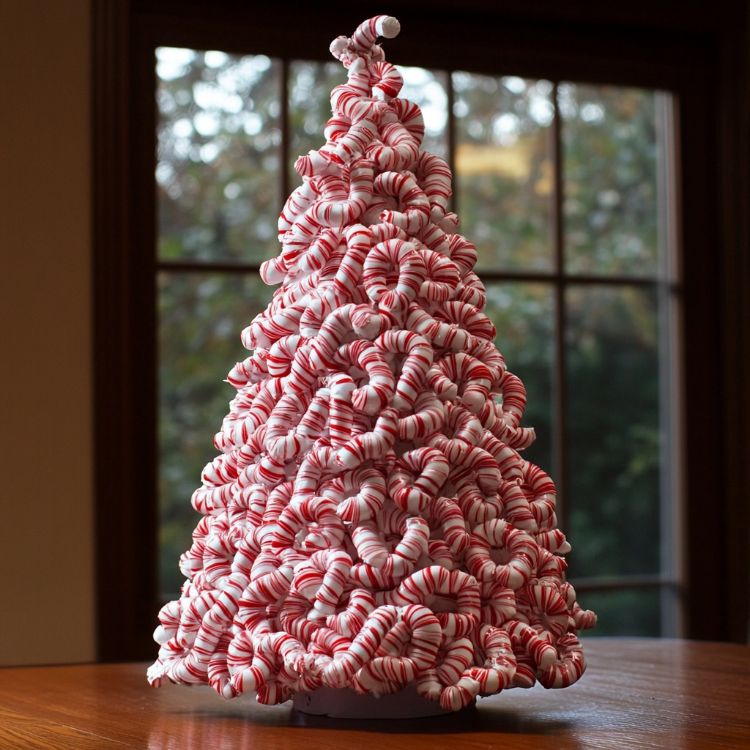
Candy Cane Holiday Centerpiece

Materials
1 Foam cone (approximately 12 inches tall)
30-40 Mini candy canes
Hot glue gun and glue sticks
Red and white ribbon (about 2 meters)
Small Christmas ornaments or decorations (optional)
Clear sealant spray (optional)
30-40 Mini candy canes
Hot glue gun and glue sticks
Red and white ribbon (about 2 meters)
Small Christmas ornaments or decorations (optional)
Clear sealant spray (optional)
Directions
Prepare your workspace by laying down newspaper or crafting paper to protect surfaces. Set up your materials for easy access.
Plug in the hot glue gun and allow it to heat up. Be cautious during its use.
Begin at the bottom of the foam cone, applying a small strip of hot glue to one side of a candy cane, then press it against the foam cone with the curved end facing outward. Hold for a few seconds until it adheres firmly.
Continue gluing candy canes around the base of the cone, ensuring each candy cane is aligned and touches the neighboring ones for a cohesive look.
Once the bottom row is complete, start the second row above it, slightly offsetting the candy canes for a staggered effect. Repeat until the entire cone is covered.
For a polished finish, wrap the red and white ribbon around the top of the cone, securing it with a dot of hot glue.
Optionally, add small ornaments or decorations to the cone by attaching them to the centers of the candy cane curves using hot glue.
To preserve the candy canes and add a glossy finish, spray the completed piece with a clear sealant. Allow it time to dry completely.
Display your new centerpiece on a table or mantel, where it can be admired by guests and family alike.
Final Looks

Advertisement
Variations & Tips
To customize this project, consider using candy canes of different sizes or colors for a more varied appearance. You can also integrate LED string lights around the foam cone to give it an enchanting glow, making it perfect for evening gatherings. Instead of a plain ribbon, try using burlap for a rustic theme or metallic ribbon for a touch of glamour. Adding pinecones or small holly leaves can also enhance the natural aesthetic if that's the look you're aiming for.