
The summertime brings warm and sunny weather and that means you can move entertaining outdoors. Whether you have a patio, deck or balcony, this DIY project will make outdoor gatherings a breeze.
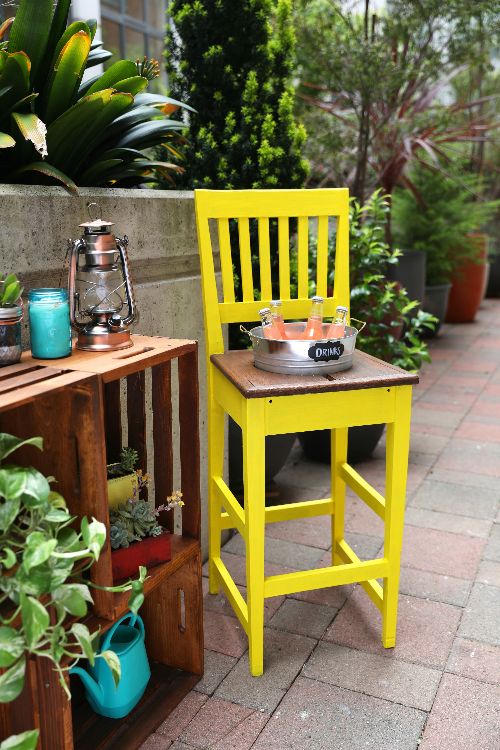
Keep your guests happy as their drinks stay cool, and add a pop of color to your outdoor space with this stunning and clever ice bucket stand made from an old chair. Plus, this upcycling project makes for a great conversation starter.
Advertisement
Materials
- Bucket with a 10-inch opening and an 8-inch base
- Measuring tape or ruler
- Cardboard
- Scissors
- Old chair
- Pencil
- Drill
- Spade bit
- Jigsaw
- Sanding block
- Stripping gel
- Paintbrush
- Platic putty knife
- Brown stain
- Yellow paint
- Chalkboard label
- Chalk
- Bucket with a 10-inch opening and an 8-inch base
- Measuring tape or ruler
- Cardboard
- Scissors
- Old chair
- Pencil
- Drill
- Spade bit
- Jigsaw
- Sanding block
- Stripping gel
- Paintbrush
- Platic putty knife
- Brown stain
- Yellow paint
- Chalkboard label
- Chalk
Instructions
1. Measure the bucket to make sure it's the right size.
1. Measure the bucket to make sure it's the right size.

DIY Everywhere
Measure both the top and bottom. In our case, the diameter of our bucket is 10 inches at the top and 8 inches at the base.

DIY Everywhere
2. Cut a 9-inch circle out of cardboard.

DIY Everywhere
3. Place the cardboard circle onto the seat of the chair and trace around the circle with a pencil.

DIY Everywhere
4. Drill a hole with the spade bit along the edge of the circle.

DIY Everywhere
This will serve as an entry point for the jigsaw.

DIY Everywhere
5. Cut along the pencil mark with a jigsaw.

DIY Everywhere
6. Sand the edges of the hole until everything is smooth.

DIY Everywhere
7. Paint stripping gel onto the seat of the chair. Allow the gel to sit.

DIY Everywhere
8. Scrape off the old paint from the seat of the chair using a plastic putty knife.

DIY Everywhere
9. Apply brown stain to the chair seat with a paintbrush.

DIY Everywhere
10. Paint the backrest and legs of the chair with yellow paint. Let dry.

DIY Everywhere
11. Attach a chalkboard label to the front of the bucket. Write the word "Drinks" on the label with chalk.
12. Put the bucket in the hole in the chair seat.

DIY Everywhere
Advertisement
DIY Everywhere