
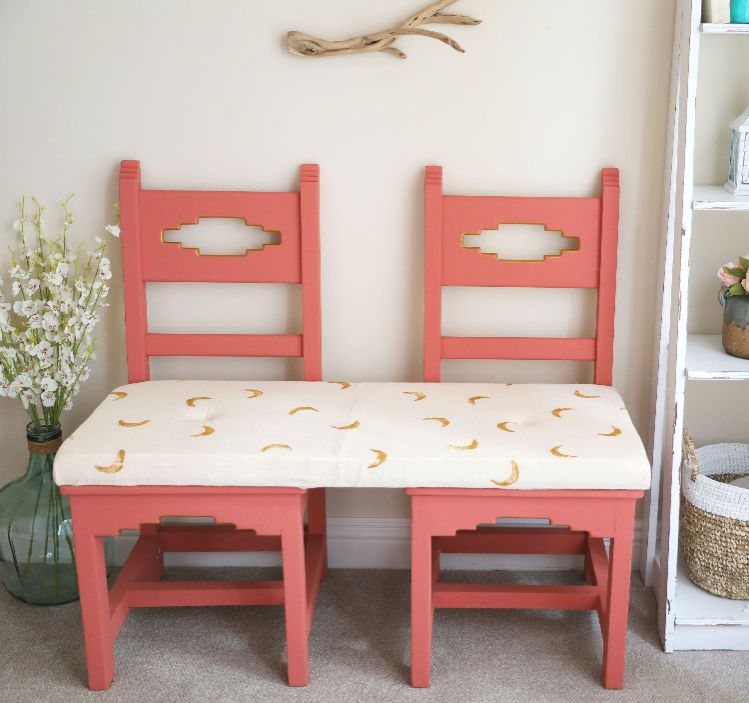
I can never get enough of upcycling projects, especially when they're as useful as this awesome bench. Don't be scared off by the idea that making a bench has to be complicated. This project is easy enough for almost anyone to make.
In fact, very little woodworking skills are required. The hardest part is making the cushion. If you don't have a power saw, have the piece of plywood for the seat cut to size at the store. Keep reading to learn exactly how to make this bench out of two chairs.
Advertisement
Materials
- Two sawhorses
- Piece of plywood
- 2 clamps
- Measuring tape or ruler
- Pencil
- Circular saw or jigsaw
- Electric drill and bit
- Upholstery foam
- Utility knife or heavy-duty scissors
- Light-colored fabric
- Staple gun
- String or yarn
- Needle
- Scissors
- Potato
- Cutting board
- Knife
- Gold paint
- Two upholstery tacks
- Two chairs
- Paint
- Paintbrush
Instructions
1. Place the piece of plywood over the sawhorses and secure it on each end with a clamp.
1. Place the piece of plywood over the sawhorses and secure it on each end with a clamp.

DIY Everywhere
2. Determine how big the bench's seat will be and mark those dimensions on the plywood.
3. Use a circular saw or jigsaw to cut the plywood to size.
4. Move the sawhorses if necessary and make sure the board is still secure.
5. Drill a hole through the board, several inches in from the end.

DIY Everywhere
6. Undo the clamps, rotate the board and secure with the clamps again. Drill a second hold through the board, several inches in from the second end.
7. Cut the upholstery foam so it's the same size as the plywood. Place the upholstery foam over the board, lining up the edges.

DIY Everywhere
8.. Cover the foam with the fabric, smoothing out any wrinkles.

DIY Everywhere
9. Flip over the cushion and carefully use the staple gun to attach the fabric to the board. Make sure to hold the fabric tight against the foam and the board.

DIY Everywhere
10. Thread the needle with the string or yarn and push the needle through one of the holes. Tie a knot in the end of the string so it doesn't go through the hole, and push the needle back down through the hole.

DIY Everywhere
11. Tie both ends of the string together to attach the cushion to the board and cut off any excess length.

DIY Everywhere
12. Repeat steps 10 and 11 for the other half of the cushion.
13. Cut a crescent moon-shaped piece out of the potato, making sure to remove the skin, to form a stamp.

DIY Everywhere
14. Dip the potato stamp in the gold paint and use it to decorate the cushion, removing any excess paint before you place it on the fabric.

DIY Everywhere
15. Put the upholstery tacks into the two holes.

DIY Everywhere
16. Place chairs side-by-side.

DIY Everywhere
Paint both chairs so they match.

DIY Everywhere
We recommend at least 2 coats and make sure to dry in between each coat.

DIY Everywhere
When dry, add gold accents to the inner part of the detailing on the back or anywhere you like.

DIY Everywhere
Advertisement
17. Place the cushion on top of the chairs.
DIY Everywhere