Wind chimes are a relaxing addition to any outdoor space. Paired with a cozy chair and tasty drink, wind chimes can help turn a patio or backyard into a getaway from the hustle and bustle of daily life.
One bonus of this DIY project is it offers the chance to upcycle silverware into something new and beautiful. By using just a few materials, you can create and hang these windchimes in your outdoor space in no time.
Advertisement
Materials
- Block of wood
- Spoon
- Clamp
- Gloves
- Drill
- Drill bit
- 2 forks
- Butter knife
- Decorative twine
- Scissors
- Brass ring
- 3 decorative keys
- Block of wood
- Spoon
- Clamp
- Gloves
- Drill
- Drill bit
- 2 forks
- Butter knife
- Decorative twine
- Scissors
- Brass ring
- 3 decorative keys
DIY Everywhere
Instructions
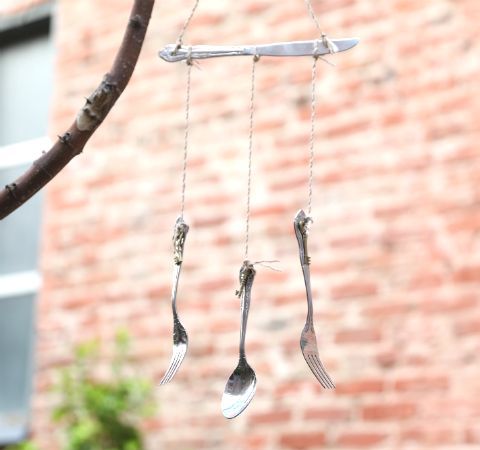
1. Place the block of wood onto the edge of a workbench and place the spoon on top of the block of wood bowl side up. Clamp both the block of wood and the spoon to the workbench.
1. Place the block of wood onto the edge of a workbench and place the spoon on top of the block of wood bowl side up. Clamp both the block of wood and the spoon to the workbench.
2. Put on gloves to protect your hands and drill a hole into the end of the spoon.
3. Repeat step 2 for both of the forks, putting the tines up, as well as the butter knife.
4. Clamp both the block of wood and the butter knife onto the edge of the workbench.
5. Drill a hole into the knife about half an inch from the tip.
6. Cut off equal sections of decorative twine. Place a piece of twine through each hole in the knife. Secure each piece of twine with a knot.
7. Tie both pieces of twine attached to the knife onto the brass ring. This will serve as a way to hang up the windchime.
8. Cut off another section of decorative twine and place it through the hole in one of the forks. Add one of the decorative keys to the twine and tie a knot in the twine to secure the key and the fork together.
9. Tie the twine attached to the fork onto the knife. Secure it with a knot.
10. Repeat steps 8 and 9 with the remaining fork as well as the spoon.
Advertisement