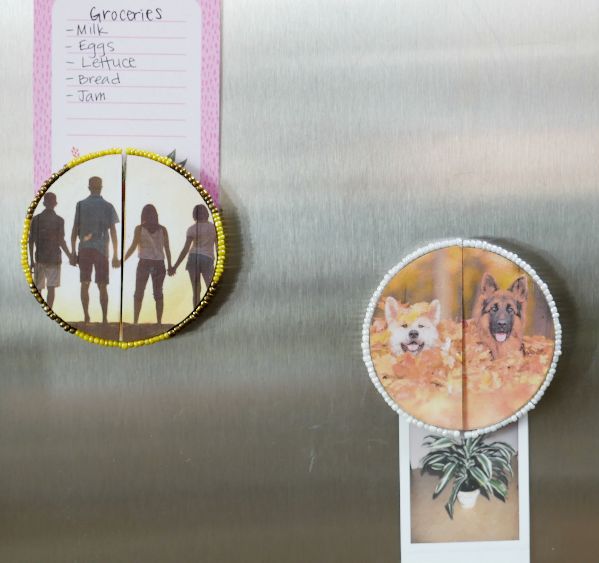
Close friends and family tend to hang out in the kitchen a lot. Take the opportunity to remind them of how special they are to you and show off your photos on the refrigerator.
These magnets are useful for holding grocery lists, short messages or any other lightweight item you want to display. They also make useful gifts for those who don't have much room to hang up framed photographs.
Advertisement
Materials
- Wood or cardboard circle, approximately 4 inches in diameter, cut in half
- Photos printed on regular printer paper
- Pencil
- Scissors
- Mod Podge
-Artist’s brush
- Small seed beads (any color)
- Small bowl
- School glue
- Tweezers (optional)
- 2 circular magnets
- Hot glue gun
- Hot glue
- Wood or cardboard circle, approximately 4 inches in diameter, cut in half
- Photos printed on regular printer paper
- Pencil
- Scissors
- Mod Podge
-Artist’s brush
- Small seed beads (any color)
- Small bowl
- School glue
- Tweezers (optional)
- 2 circular magnets
- Hot glue gun
- Hot glue
DIY Everywhere
Instructions
1. Place the two circle halves together on top of the image you want to display.
1. Place the two circle halves together on top of the image you want to display.
2. Trace around the circle, using a pencil.
3. Place one half of the wood circle on top of the cut-out photo.
4. Trace a line along the straight edge.
5. Cut the photo circle in half along the straight line.
6. Apply a layer of Mod Podge to half of the wood.
7. Adhere one of the picture halves.
8. Repeat picture application for the other wood half.
9. Apply a layer of Mod Podge over the attached photos. Let them dry.
10. Empty a small bag of seed beads into the bowl.
11. Apply school glue along 1 inch of the outside of the curved rim.
12. Press beads into the glue along the edge using your fingers or tweezers.
13. Continue applying beads until both curved edges are done. Do not glue beads to the straight edge. Let the glue dry.
Advertisement
14. Hot glue a magnet onto the back of each half.