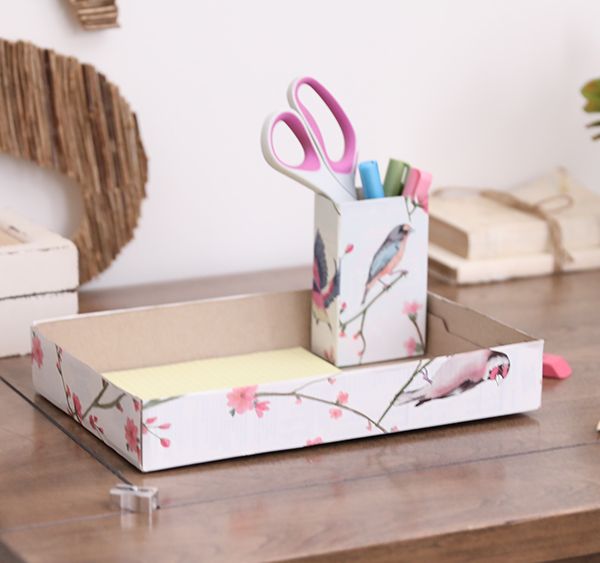
Corral stray pens and pencils while adding a decorative touch to a desk with this fun project that reuses empty cereal boxes. Whether it's Lucky Charms, Frosted Flakes or Cheerios, the logos will be covered by self-adhesive shelf liner, so you don't have to worry about what some might see as a juvenile design.
This organizer is made from non-corrugated cardboard, which means it's not as sturdy. Only place heavy items in the organizer if you don't plan to pick it up and move it. If it's staying where it is forever, go ahead and load it up with scissors, paper and anything else that tries to hide from you when you need it.
Advertisement
Materials
- Empty cereal box
- Empty mini cereal box
- Hot glue gun
- Hot glue
- Craft knife
- Self-adhesive shelf liner or contact paper
- Marker
- Scissors
- Empty cereal box
- Empty mini cereal box
- Hot glue gun
- Hot glue
- Craft knife
- Self-adhesive shelf liner or contact paper
- Marker
- Scissors
Instructions
1. Stand the larger box upright and open the top. Apply glue to the side flaps and adhere the inside flap to the side flaps. Apply glue along the outside top of the inner flap and adhere the top flap to it. Let the glue dry.
1. Stand the larger box upright and open the top. Apply glue to the side flaps and adhere the inside flap to the side flaps. Apply glue along the outside top of the inner flap and adhere the top flap to it. Let the glue dry.
2. Place the box flat on the work surface, with the front side facing up. Use the craft knife to cut along three of the four front edges. Open the newly created front flap and cut along the fourth edge to remove the face.
3. Unroll the shelf liner or contact paper. Place each side of the box against the back side of the contact paper and trace each panel. Cut out each rectangle. Do the same for the back of the box.
4. Peel the paper from the corner and apply the contact paper to the corresponding box side. Trim excess paper. Repeat this step for all four sides and the back.
5. Cut off the top of the mini cereal box. Cover the box with liner as done in steps 3 and 4. Note that when lying down, this box has three sides, plus a front and a back.
Advertisement
6. Place the small box upright in a corner of the larger box, which should lie down.