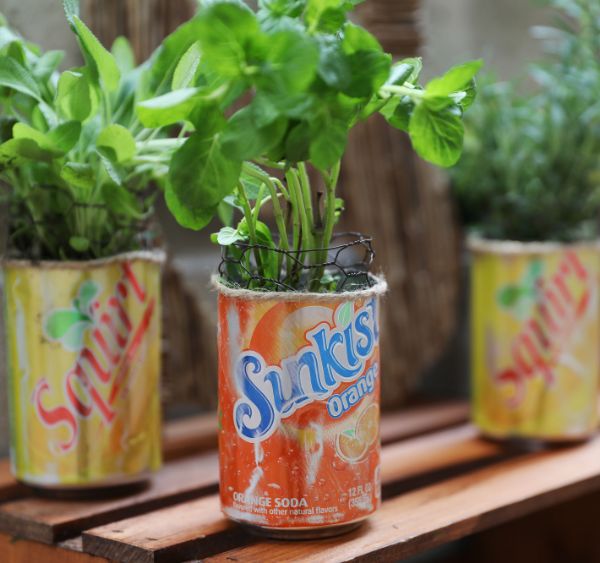
Want a fresh herb garden but lack the outdoor space? This simple project will give you as big or small a garden as you would like, with brightly colored containers adding color to the space. This craft brings new life to empty aluminum soda cans, giving the garden a funky, upcycled look.
Potting herbs in aluminum cans allows for a flexibility not available with traditional gardens. You can line cans up in a kitchen window, for instance, or spread them out along multiple windows. Or if there's outdoor space but no garden bed, group the cans to bring vibrant colors and fragrances to a patio. Follow the guidelines for each type of plant for sunlight and watering amounts.
Advertisement
Materials
- Gloves
- Sharp craft knife
- Empty soda cans
- Sandpaper or sandpaper block
- Chicken wire, about 4 inches by 6 inches for each can
- Pliers
- Hot glue gun
- Hot glue sticks
- Craft twine
- Scissors
- Potting soil
- Herb seedlings, such as basil, mint, oregano or rosemary
- Gloves
- Sharp craft knife
- Empty soda cans
- Sandpaper or sandpaper block
- Chicken wire, about 4 inches by 6 inches for each can
- Pliers
- Hot glue gun
- Hot glue sticks
- Craft twine
- Scissors
- Potting soil
- Herb seedlings, such as basil, mint, oregano or rosemary
DIY Everywhere
Instructions
1. Put on the gloves, and carefully cut away the top portion of the aluminum can. Begin about an inch below the top, and slowly cut around the can. Safely dispose of the top. Be cautious: Raw edges are extremely sharp.
1. Put on the gloves, and carefully cut away the top portion of the aluminum can. Begin about an inch below the top, and slowly cut around the can. Safely dispose of the top. Be cautious: Raw edges are extremely sharp.
2. Distress the sides of the can using the the sandpaper or sandpaper block. Carefully sand the cut edge of the can, smoothing it for safer handling.
3. Still wearing the gloves, roll the piece of chicken wire into a tube that will fit just inside the can. Seal the two long edges of the wire tube with pliers. Twist the end wires together.
4. Set the chicken wire tube just inside the can. Allow about 3 inches of the wire cage to stick out above the top edge of the can.
5. Wrap the twine around the can, and cut off a length long enough to circle the top. Make it longer if you want to tie a bow. Dab hot glue along the rim of the can, pressing the craft twine into the glue.
6. Finish the twine with a bow, or simply seal it with glue and snip the ends.
7. Set the herb plant securely in the can. Fill in the sides and top with potting soil.
Advertisement
8. Repeat as desired until you have as many planters as you need.