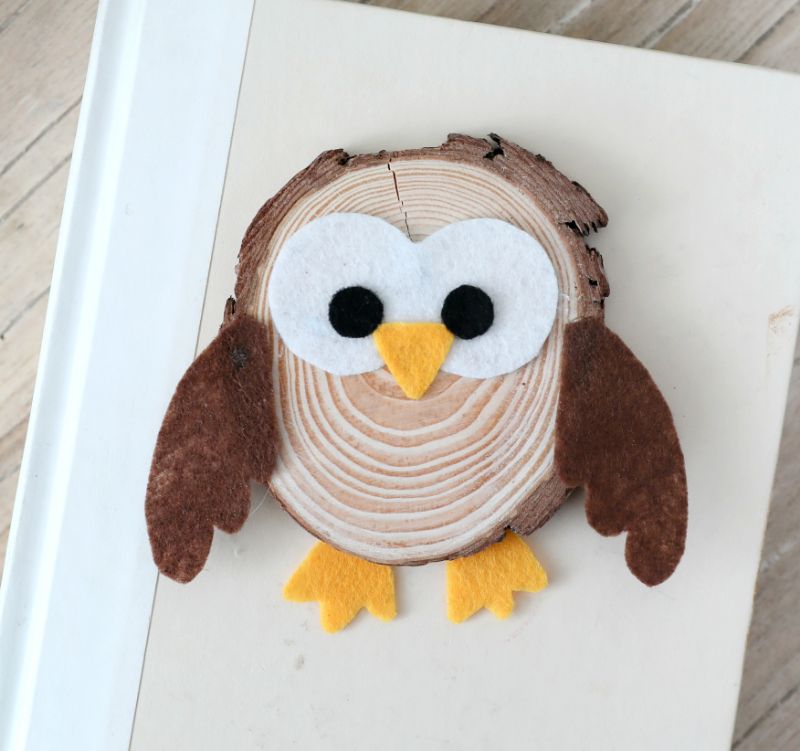
Bring the charm of nature’s wisest creature indoors by creating a one of a kind DIY owl using a wood slice as a foundation. This project is the perfect activity for a rainy afternoon indoors with the kids and doesn’t require much more than some felt and a hot glue gun. Any size of wood slice will do as long as the inner rings are lighter than the outer edges for a more realistic look to the final feathered project.
White felt for the eyes of this adorable wood slice owl topped with small black cutouts is all it takes to create that wide-awake look owls are known for. When combined with an orange beak and feet as well as soft-felt feathers, this wood slice owl comes to life with a personality all its own. When this project is complete, the owl would work well on any shelf in the home but might fit best in a child’s room or reading nook. Wherever it lands, this feathered friend sure to be an eye-catching hit.
Advertisement
Materials
- Wood slice, 6 inches in diameter
- White felt
- Blue colored pencil
- Scissors
- Hot glue gun
- Orange felt
- Black felt
- Brown felt
- White colored pencil
- Wood slice, 6 inches in diameter
- White felt
- Blue colored pencil
- Scissors
- Hot glue gun
- Orange felt
- Black felt
- Brown felt
- White colored pencil
DIY Everywhere
Instructions
1. Place a wood slice 6 inches in diameter on a flat working surface.
2. Draw two large circles that slightly overlap in the middle on a piece of white felt using a blue colored pencil.
3. Cut out the circles from the felt as a single piece following the outer edge as a stencil.
4. Apply hot glue to the side of the white felt cutout with blue pencil markings. Flip over the white cutout and press it to the wood slice about 1 inch below the top edge.
5. Cut a small triangle and two feet with three talons each from a piece of orange felt.
6. Line the back of the orange triangle with hot glue and press it to the wood slice. Position the triangle on the bottom edge and center of the white felt cutout with the triangle point facing down as the owl’s beak.
7. Apply hot glue to the top edge of both feet cutouts and press them to the bottom and back side of the wood slide leaving 1 inch between.
8. Cut out two small circles for pupils from black felt.
9. Apply hot glue to the back of the black circles and press one to each top corner of the orange triangle beak.
10. Draw two identical wings on brown felt using a white colored pencil.
11. Cut out the wings and use hot glue to attach one to each side of the top of the wood slice to complete the owl.
Advertisement
12. Let it dry completely before putting it out for display.