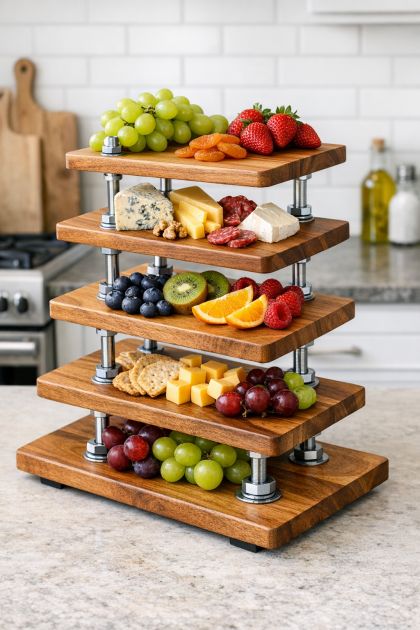
This DIY project transforms basic wooden cutting boards into a stunning 6-item tiered serving station, perfect for any kitchen. By simply drilling and bolting the boards together, you create a functional and aesthetically pleasing centerpiece that adds both style and utility to your culinary space. This project is ideal for those looking to maximize their serving options without sacrificing counter space, and it offers a unique way to showcase your culinary creations during gatherings.
Place the finished tiered serving station in the center of your kitchen island or dining table for an inviting focal point. Coordinate with warm-toned kitchen accessories or decor to complement the natural wood texture. Use it to display an array of items, such as cheeses, fruits, or pastries, adding pops of color and a touch of elegance to your kitchen. The natural wood finish harmonizes beautifully with both rustic and modern interiors, making it a versatile addition to any home.
Tiered Wooden Cutting Board Serving Station
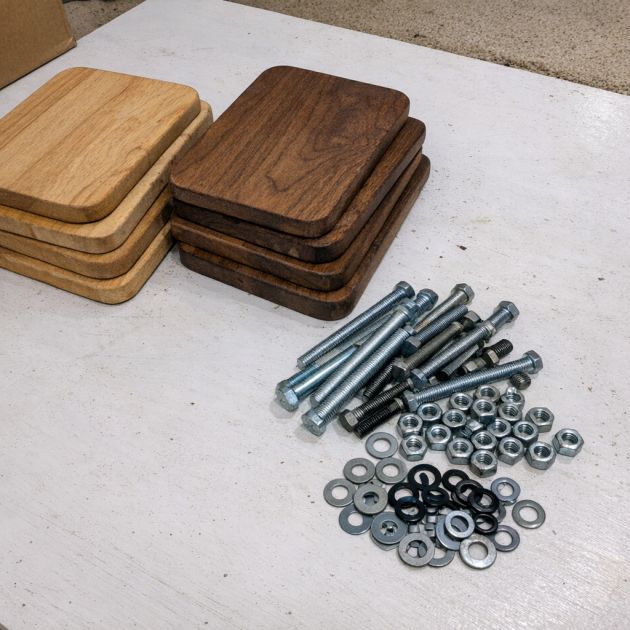
Materials
4 wooden cutting boards (approximately 12x18 inches each)
6 stainless steel bolts (1/4 inch diameter, 2 inches long)
6 matching nuts
12 washers (1/4 inch)
Electric drill with 1/4 inch drill bit
Wrench
Directions
Place the first cutting board on a flat surface, marking four equidistant points near each corner for drilling.
Drill 1/4 inch holes at each marked point on all four boards.
Stack the boards, aligning the drilled holes. Place a washer on top of each hole of the bottom board.
Insert a bolt through each hole, securing with another washer and a nut underneath. Tighten using a wrench.
Repeat the process for all stacks, ensuring each tier is evenly spaced and stable.
Adjust the nuts and bolts to ensure the structure is level and secure. The final structure should consist of four tiers, each separated by the thickness of the bolts and washers.
Variations & Tips
For a personalized touch, consider staining or painting the cutting boards in complementary colors to match your kitchen's theme. Alternatively, use boards of varying shapes or sizes to create a more dynamic visual effect. Adding small rubber feet to the bottom board can help prevent slipping and protect countertops. If you desire additional levels, simply increase the number of boards and adjust the bolt lengths accordingly, ensuring all connections remain secure.