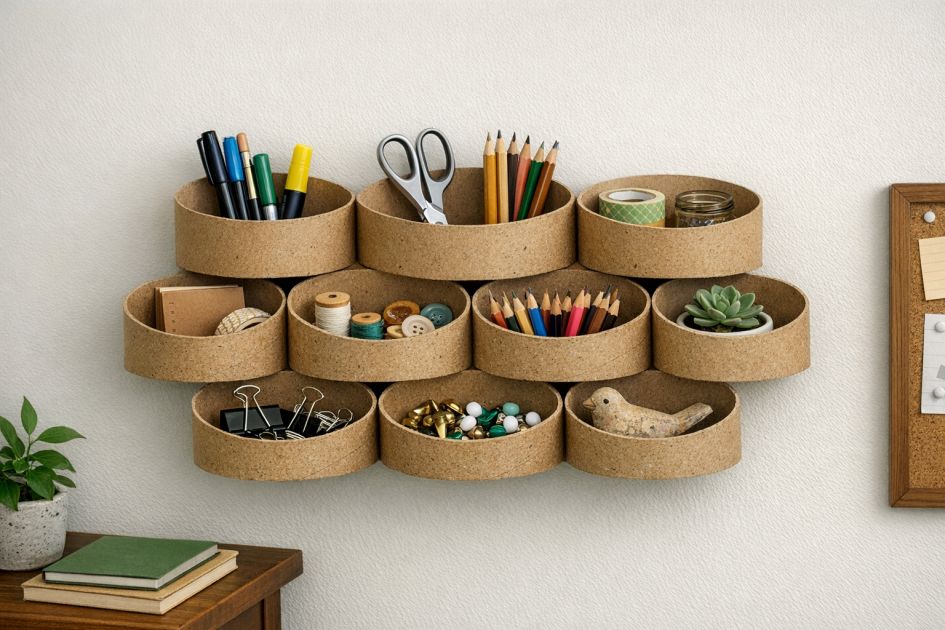
Cardboard tubes, often discarded without a second thought, can be repurposed into a functional and stylish wall organizer. This clever DIY project allows you to transform these everyday items into a nine-item wall organizer, perfect for tidying up and adding a touch of creativity to your home decor. This project is easy on the wallet and offers a fun way to recycle, making it an ideal craft for those looking to reduce waste while enhancing their living space.
Once completed, this cardboard tube wall organizer can be styled in a home office, study area, or even a craft room. Consider placing it against a brightly painted wall to make the natural color of the cardboard pop. You could also paint the tubes in a color scheme that complements your room's decor for a more cohesive look. Adding small potted plants or decorative items inside the tubes can enhance its aesthetic appeal, turning a simple organizer into a striking wall feature.
Cardboard Tube Wall Organizer
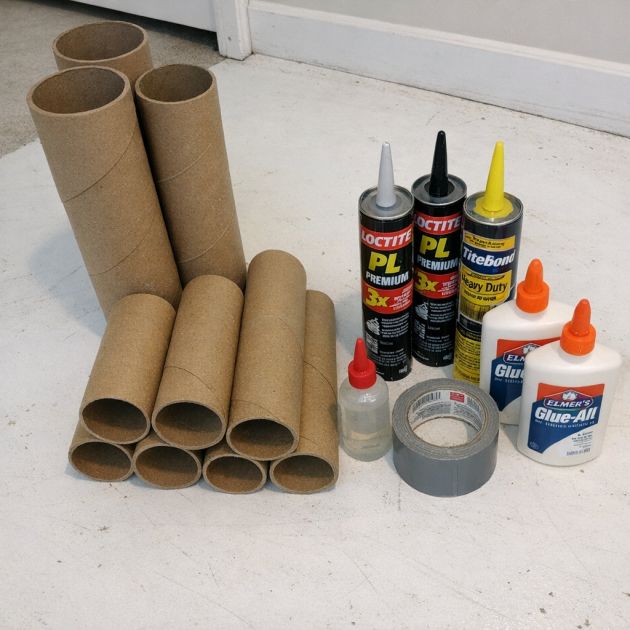
Materials
8 cardboard tubes (each approximately 4 inches in diameter and 12 inches in length)
Craft glue or hot glue gun
Ruler
Pencil
Scissors or box cutter
Paint (optional, for decoration)
Paintbrush (optional, for decoration)
Wall-mounting adhesive strips or hooks
Directions
Measure and cut each cardboard tube into equal halves, resulting in 16 half-tubes.
Arrange the half-tubes into a honeycomb pattern with three rows: the bottom and middle rows containing three tubes each, and the top row containing two tubes.
Once satisfied with the arrangement, use craft glue or a hot glue gun to adhere the edges of the tubes together, forming a solid, interconnected structure.
Allow the glue to dry completely, ensuring the structure is stable and secure.
If desired, paint the exterior of the tubes using a paintbrush. Apply one or two coats, allowing each coat to dry thoroughly before applying the next.
Once the paint is dry, attach wall-mounting adhesive strips or hooks to the back of the organizer.
Carefully position and press the organizer onto the desired wall location, ensuring it is level and securely mounted.
Variations & Tips
To personalize your cardboard tube wall organizer, consider varying the tube lengths to create an asymmetrical design with staggered rows. This can add visual interest and accommodate larger items. Additionally, you could wrap the tubes in decorative paper or fabric for a more textured appearance. For a more robust structure, consider reinforcing the tubes with a thin layer of papier-mâché before painting, or use stronger adhesive products for a longer-lasting hold. These variations maintain the core concept of using recycled materials to create functional home decor.