This DIY project transforms abandoned garden hoses into a unique and functional crochet outdoor floral planter. By repurposing old hoses, you're not only reducing waste but also creating a sturdy, weather-resistant planter that adds a touch of creativity to your garden space. This project solves the problem of what to do with unused garden hoses, turning them into an eye-catching piece of garden decor.
The finished crochet planter can be styled as a hanging garden accent or placed on a patio table as a centerpiece. Use a vibrant color palette for the yarn, such as bright greens, blues, or yellows, to contrast with the natural hues of the garden hoses. The texture should be tight and uniform, creating a sturdy structure that supports the weight of soil and plants. Consider arranging multiple planters at varying heights to create a layered, dynamic look.
Crochet Garden Hose Floral Planter
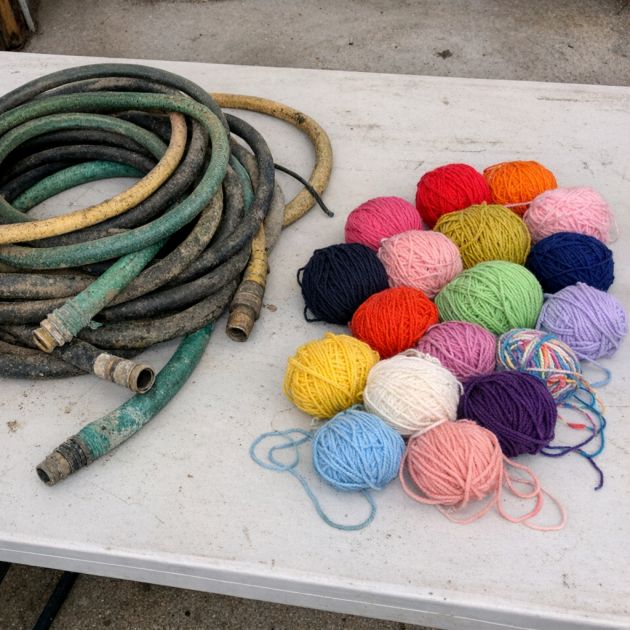
Materials
Abandoned garden hoses (approximately 10 feet, cut into smaller sections as needed)
Thick cotton yarn (super bulky weight, approximately 200 yards)
Crochet hook size 10mm
Strong scissors or garden shears
Tapestry needle
Optional: Stitch markers
Directions
1. Begin by cutting the garden hose into segments that will serve as the frame of your planter. Cut three pieces, each about 3 feet long.
2. With the cotton yarn, create a slip knot and secure it onto your crochet hook.
3. Position one hose segment vertically and crochet around it using single crochet stitches, ensuring the yarn wraps tightly around the hose. Continue until the entire length is covered.
4. Repeat the process for the remaining two hose segments.
5. Once all segments are covered, arrange them in a triangular formation to form the base of the planter.
6. Using the yarn, crochet the segments together at the vertices with single crochet stitches, creating a stable triangular base.
7. Begin crocheting a circular base by making a magic ring and working in continuous rounds: Round 1: 6 single crochet (sc) into the ring. Round 2: 2 sc in each stitch around (12 sts). Round 3: *1 sc, 2 sc in next st* repeat around (18 sts).
8. Place the circular base inside the triangular frame and secure it by crocheting the edges of the circle to the hoses using slip stitches.
9. To create the sides of the planter, continue crocheting up from the base in rounds, working 1 sc in each stitch. Adjust tension to ensure a snug fit around the hose frame.
10. Once the desired height is reached, fasten off and weave in any loose ends using the tapestry needle.
11. Add any decorative elements, such as crocheted flowers or leaves, to personalize your planter.
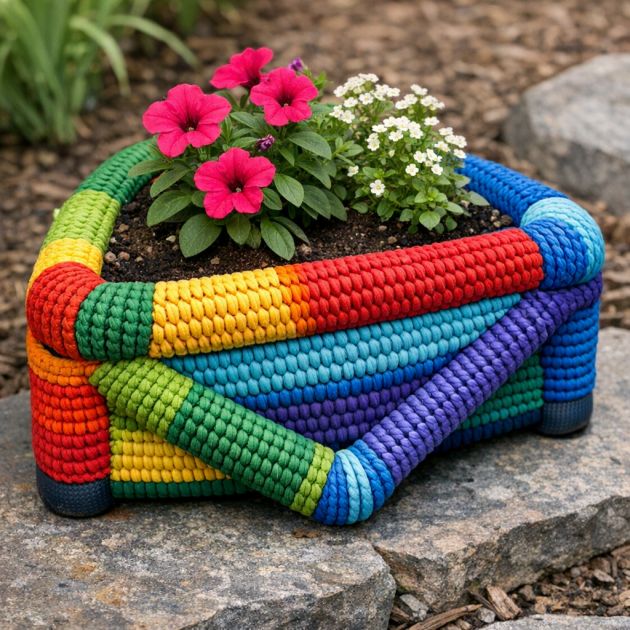
Variations & Tips
For variations, consider using different types of yarn, such as recycled polyester or jute, for a more eco-friendly approach. Experiment with color combinations to match your garden's theme or your personal style. You can adjust the size of the planter by increasing or decreasing the length of the hose segments or the number of rounds crocheted for the base and sides. For a different texture, try incorporating bobble or puff stitches into the outer walls of the planter.