I’ve always had a soft spot for the kind of kitchen project that sounds a little odd at first and then turns out so useful you wonder why everybody isn’t making one. This hanging fruit basket is exactly that sort of thing. By crocheting jute twine right through a metal splatter screen, you can turn an everyday kitchen tool into a sturdy, airy basket that keeps summer produce off the counter and right where you can see it.
It’s a lovely project for beginners who know a few basic crochet stitches, and it’s just as satisfying for seasoned makers who enjoy a clever bit of upcycling. I’m especially fond of this one in warm weather, when tomatoes, peaches, lemons, or onions seem to multiply overnight. It has that homespun, practical charm I grew up with—simple materials, a little patience, and something handmade that earns its keep.
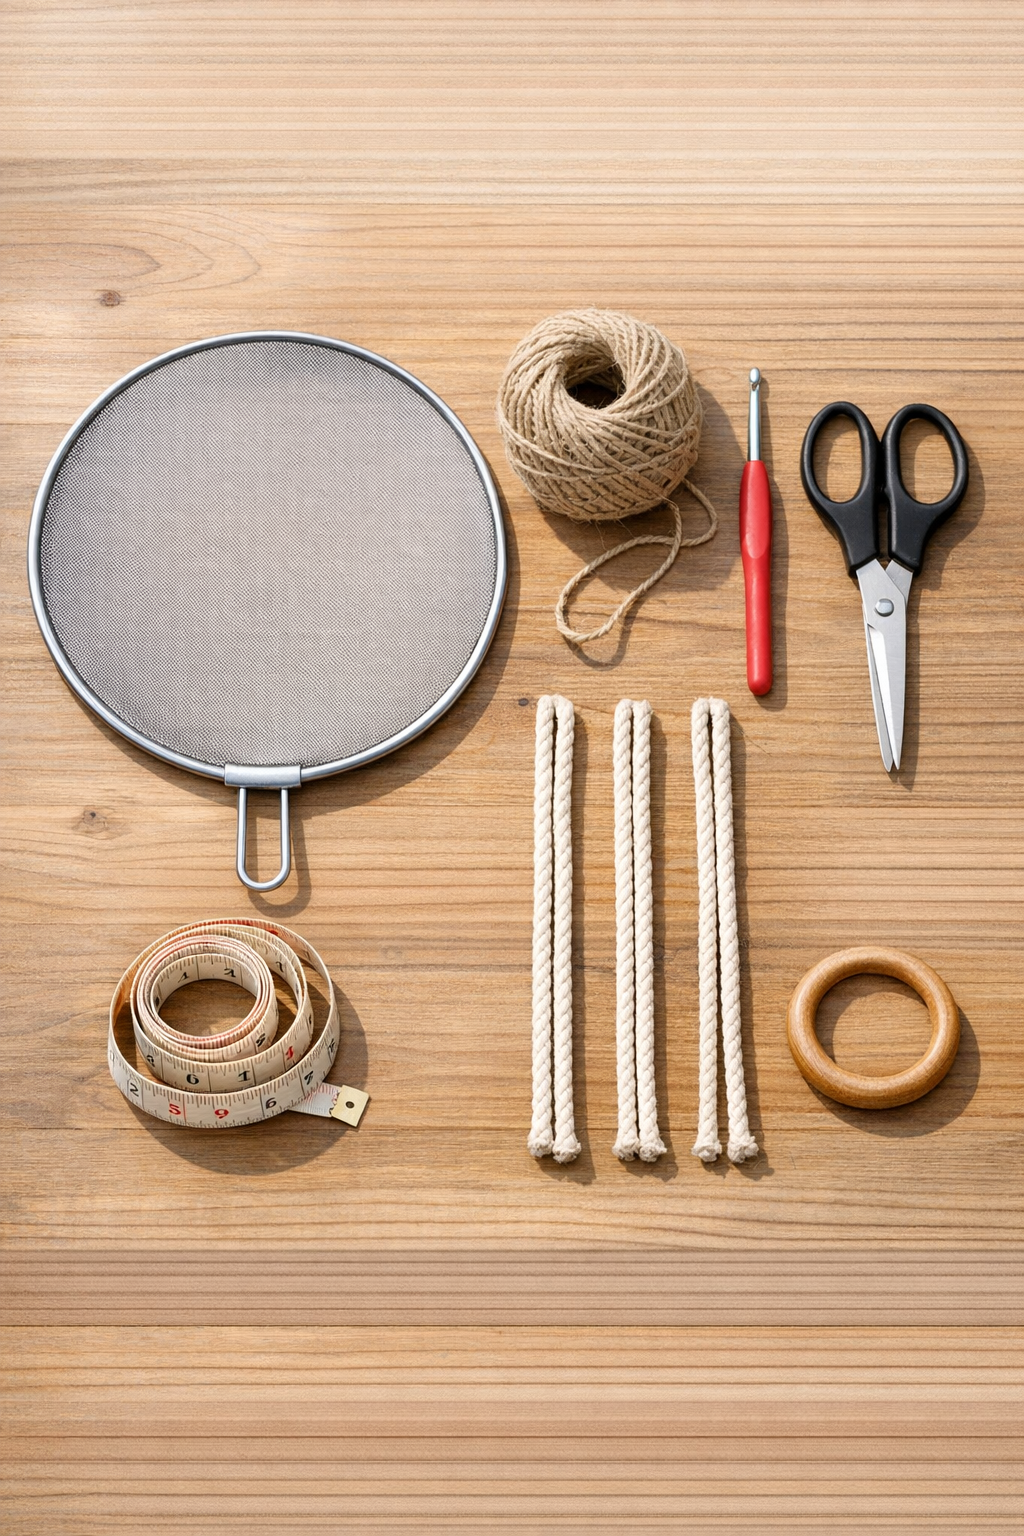
Materials
1 round metal splatter screen, 11 to 13 inches wide, with handle removed if possible
Instructions
1. Remove the handle from the splatter screen if it unscrews, or trim away any loose hardware so the screen lies flat and smooth. Wipe the metal clean and dry so the twine won’t pick up grease or dust.
2. Cut a starting length of jute twine about 6 feet long and wrap a tiny piece of tape around the end if it wants to fray. This makes it much easier to pull through the screen openings as you work.
3. Crochet a foundation edge directly around the outer rim of the splatter screen by pulling the twine around the metal edge and making single crochet stitches evenly all the way around. Keep the stitches snug but not tight, and aim for one stitch every 1/4 inch or so.
4. Join the last stitch to the first with a slip stitch, then add one more round of single crochet into those edge stitches to build a stronger border. This firm rim helps the basket hold its shape once it’s hanging.
5. Mark 6 evenly spaced points around the rim with small loops of scrap twine or by counting stitches. These marked spots will guide the basket shaping so it draws up evenly instead of bunching to one side.
6. Start the basket body by chaining 5, skipping to the next section, and attaching with a single crochet at each marked interval to create open mesh spaces. Continue around so you have a loose lattice stretching inward from the rim.
7. Work another round of chain-5 loops, attaching into the center of each loop from the previous round rather than the metal screen. Gently pull the work upward as you go so the basket begins to cup instead of staying flat.
8. Continue adding rounds of chain loops, reducing to chain 4 and then chain 3 as the opening narrows near the base. Stop when the basket is deep enough to cradle fruit, usually after 4 to 6 mesh rounds.
9. Close the bottom by slip stitching across the final few loops and tightening the center opening until only a small gap remains. Weave the twine tail securely through several stitches with the tapestry needle and trim the excess.
10. Cut 3 hanging cords, each 36 inches long if you haven’t already, and tie them securely to the crocheted rim at 3 evenly spaced points. Double-knot each one and thread the ends through nearby stitches for extra security.
11. Gather the top ends of the 3 cords through the hanging ring and knot them together above the ring, leaving 2 to 3 inches above for balance. Hold the basket up before trimming to make sure it hangs level.
12. Fill the basket with lightweight fruit such as lemons, limes, avocados, or small onions, and hang it from a sturdy hook. Keep the first load modest while the jute settles into shape, then adjust the cords if needed.

Variations & Tips
For a softer look: Use unbleached cotton macramé cord instead of jute if you want a lighter color and a less scratchy finish. It gives the basket a cleaner, more cottage-style look.
For heavier fruit: Choose a smaller basket and shorten the hanging depth if you plan to store denser produce like apples or potatoes. A shallow basket puts less strain on the mesh and cords.
Rim support tip: If your splatter screen feels flimsy, crochet two tight rounds around the rim instead of one before shaping the basket. That little bit of extra structure makes a surprising difference.
Good produce choices: This basket is best for fruits and vegetables that like airflow, such as citrus, onions, shallots, or underripe avocados. I’d skip anything overly soft or juicy that might bruise or leak.
Make it more decorative: Thread a few wooden beads onto the hanging cords before tying the top knot, or add a simple tassel at the bottom point. It’s a sweet way to make a practical project feel special.
My best kitchen advice: Hang the basket where you’ll actually reach for what’s inside—near a pantry door, beside a sunny window, or in a breakfast corner. In my experience, fruit that’s easy to see is fruit that gets eaten.