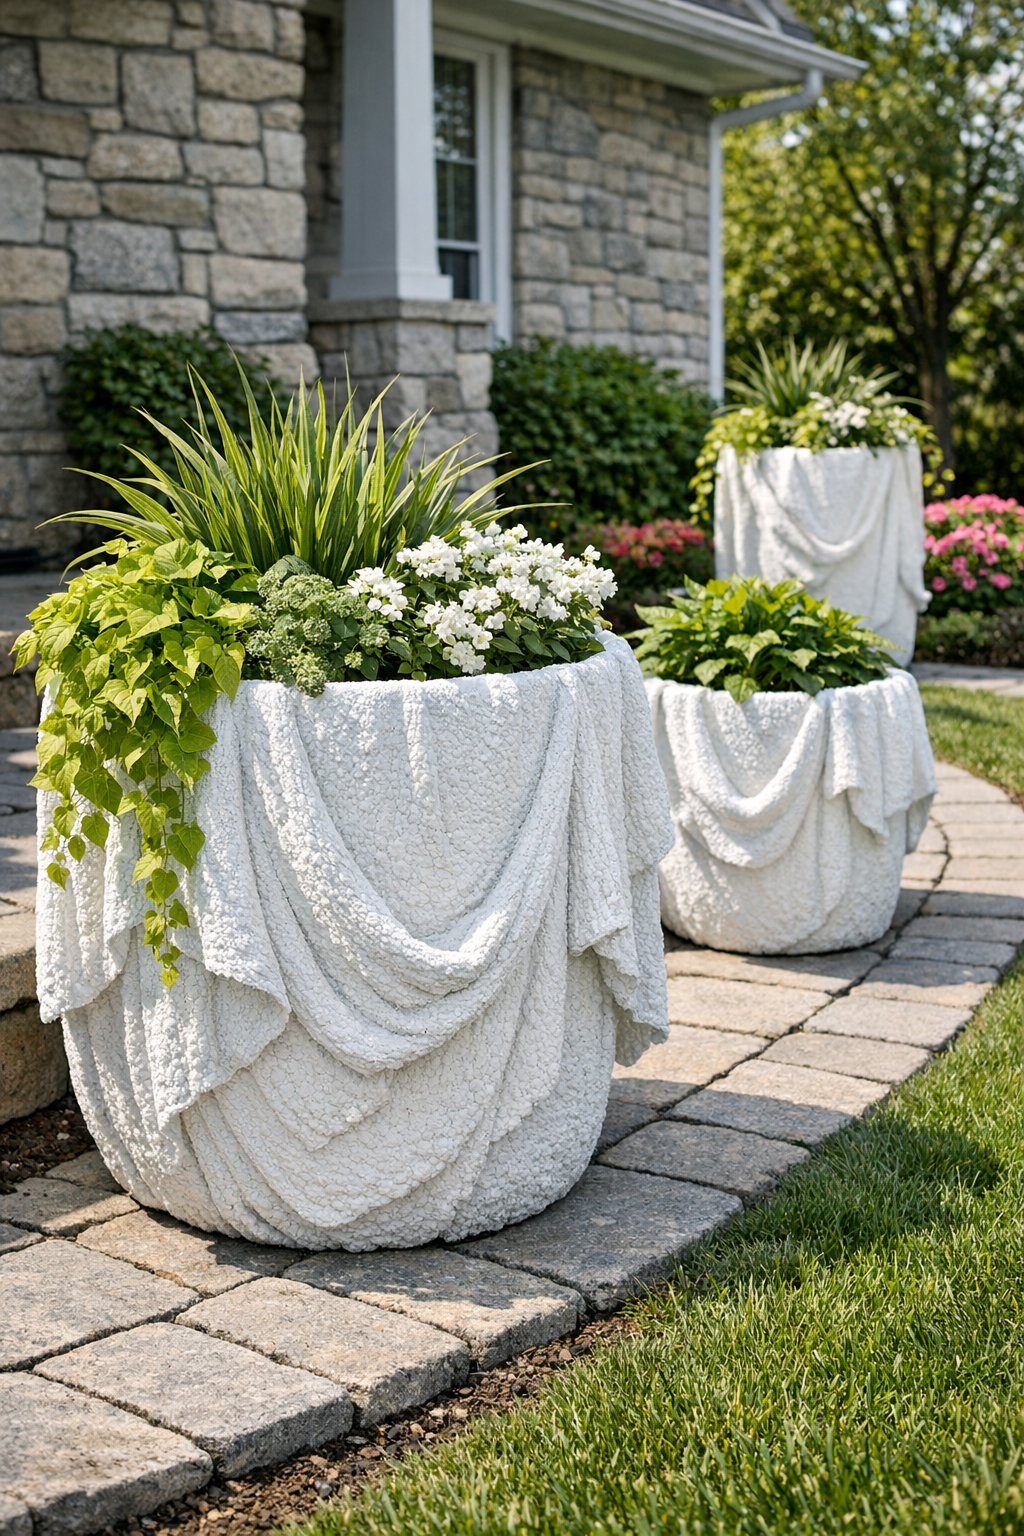
When I first heard about using bath mats with concrete, I’ll admit I raised an eyebrow. But once I tried it for my own front yard, I understood the fuss right away. This project turns inexpensive textured bath mats into oversized, sculptural white concrete planters that look far more expensive than they are, and the texture catches the light in such a pretty way from the sidewalk.
If you want a bold front yard update that feels custom without needing fancy molds, this is a wonderful weekend project. I especially love it for anyone decorating a porch, walkway, or garden bed, because you can make a whole matching set in different sizes. And if your family is anything like mine, these big statement planters make even simple greenery feel dressed up and special.
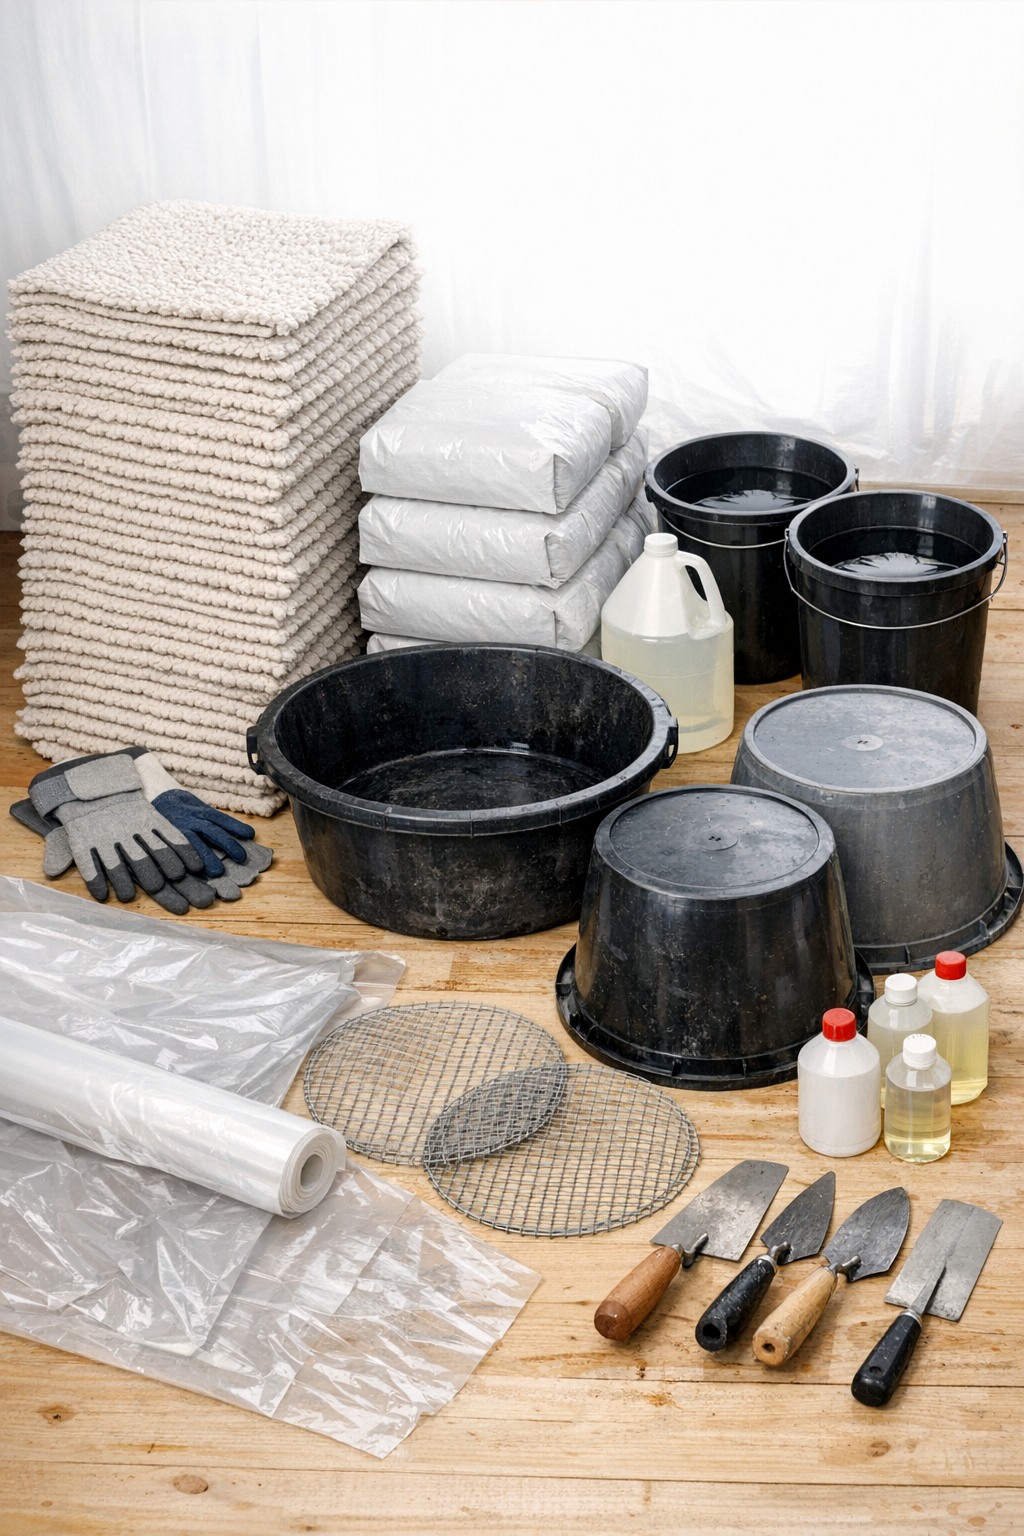
Materials
80 textured bath mats, approximately 20 x 30 inches each
Instructions
1. Set up your work area on a flat surface outdoors or in a well-ventilated garage, and cover everything with tarps or plastic sheeting because this project gets messy fast.
2. Group the 80 bath mats into 10 stacks of 8 mats each so you can make 10 thick planters, and choose mats with strong texture because that surface pattern is what gives the finished pots their charm.
3. Cut 10 wire mesh panels to about 18 x 28 inches so each one will sit inside a folded mat shell and add strength without poking through the edges.
4. Flip your nursery pots or buckets upside down on the tarp, then lightly coat the outside with petroleum jelly or cooking spray so the concrete-draped mats release cleanly later.
5. In a mixing tub, combine one bag of white concrete mix with about 4 to 5 quarts of water and a splash of bonding additive, then stir until it reaches a thick pancake-batter consistency that will fully soak the fabric without dripping like soup.
6. If you want a brighter white finish, mix in a little white concrete pigment or a portion of white mortar mix, then blend thoroughly so the color stays even across the planter.
7. Dip one bath mat into the concrete mixture, press it down until fully saturated, and lift it slowly so the excess drips back into the tub for a few seconds.
8. Lay a second soaked mat on top of the first, sandwich a wire mesh panel between middle layers, and continue stacking until you have 8 saturated mats layered together into one thick sheet.
9. Drape the full layered mat stack over an upside-down bucket or pot, centering it so the sides fall evenly and the texture remains visible instead of getting flattened.
10. Use your hands to shape soft folds and rounded corners, then secure the top lightly with rubber bands or bungee cords if needed so the stack does not slide while curing.
11. Press a plastic saucer or shallow bowl gently against the top center to create a flatter planter bottom, and tuck in wooden shims where needed so you leave a couple of drainage gaps.
12. Repeat the soaking, layering, and draping process for the remaining mat stacks until all 10 planters are formed, mixing fresh batches of concrete as you go so the slurry stays workable.
13. Let the planters cure undisturbed for 24 to 36 hours, then mist them lightly if the weather is very hot or windy so the concrete does not dry too fast and crack.
14. After the initial set, remove the rubber bands and gently lift each planter off its mold, then stand it upright and check that the drainage openings are clear.
15. Let the planters continue curing upright for another 5 to 7 days before sealing, and keep them covered loosely with plastic if rain is expected.
16. Brush off any loose grit and apply a thin, even coat of exterior masonry sealer inside and out, then let it dry according to the product directions before adding soil and plants.
17. Fill each planter with a few inches of gravel if desired, then add potting soil and your favorite front-yard plants, keeping the arrangement simple so the textured white finish stays the star.
Variations & Tips
For picky plant parents: If you are nervous about caring for fussy flowers, start with hardy plants like coleus, sweet potato vine, ferns, or small ornamental grasses. They give you that full, welcoming look without demanding too much.
Make them taller: Use taller upside-down buckets or narrow nursery pots as your forms if you want more height near a doorway. I like varying heights in sets because it makes the whole front yard feel more layered and intentional.
Keep the texture crisp: Avoid overworking the wet mats once they are draped. A gentle touch keeps the bath mat pattern visible, which is the detail that makes these planters look custom.
Use smaller batches: If you are working alone, mix half-bags of concrete at a time so nothing starts setting before your mats are soaked. That little bit of patience saves a lot of stress.
Add a softer finish: If you prefer a chalky cottage-garden look instead of bright white, skip the extra pigment and let the natural white concrete cure as-is. It weathers beautifully.
Prevent cracking: The wire mesh really matters in larger planters, especially if you are using all 8 mats per form. It gives the sides enough structure to handle soil weight once planted.
Winter care: In colder climates like ours, I recommend moving these under cover or emptying them before deep freezes if they are especially large and heavy. That extra step helps them last much longer year after year.