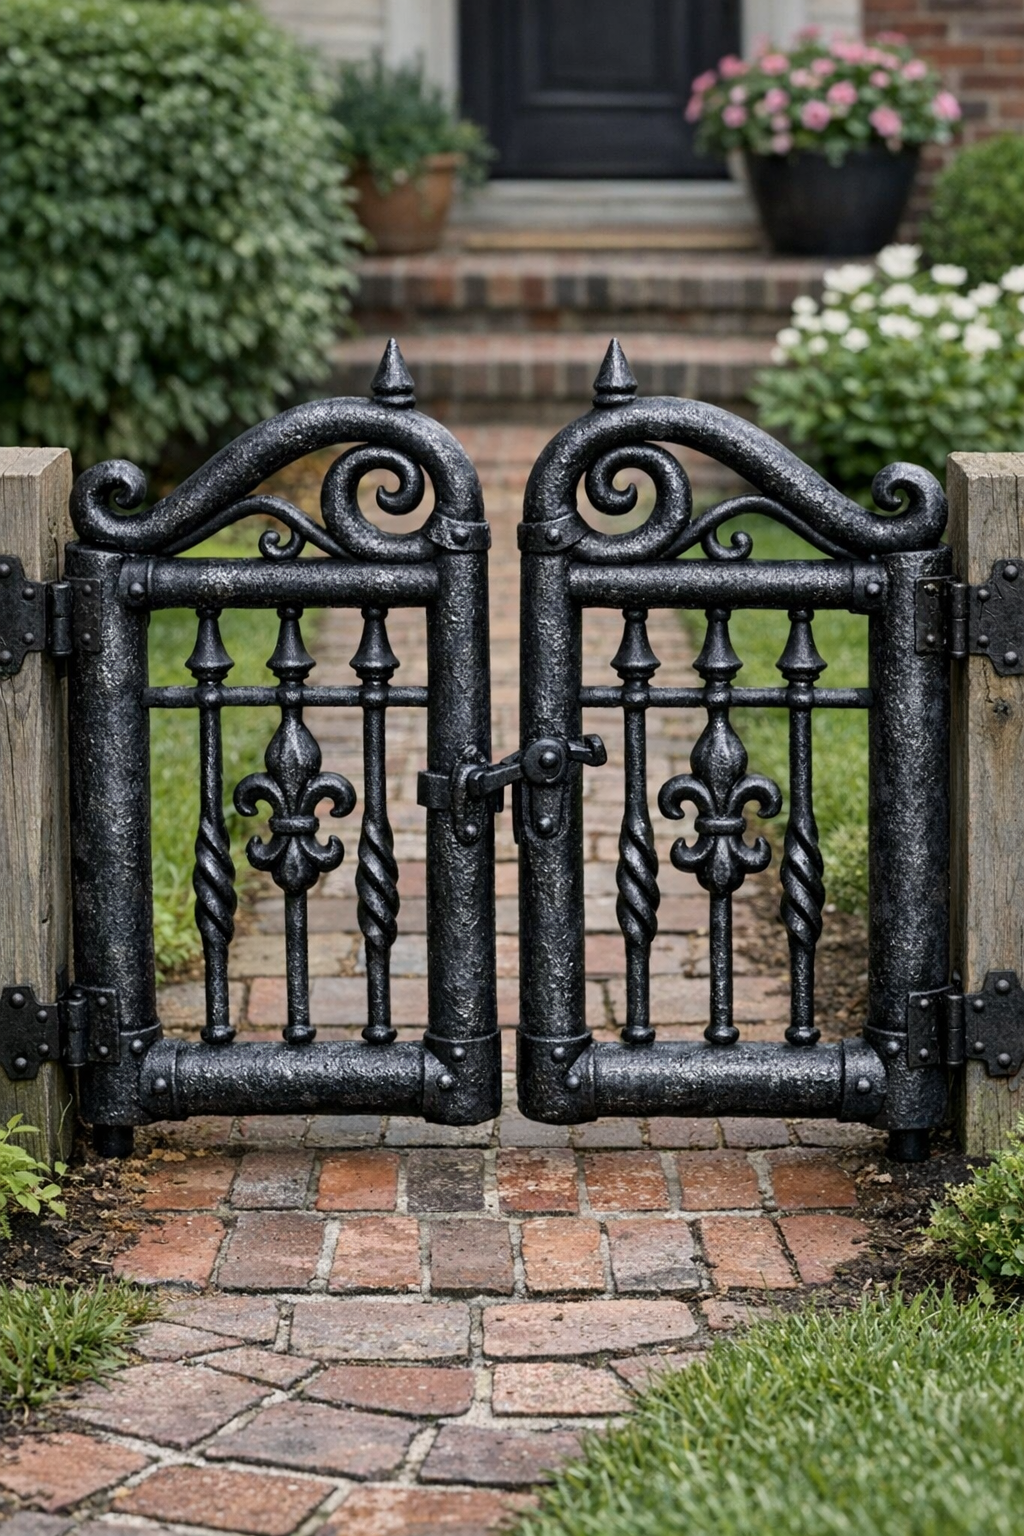
If you want the look of old wrought-iron front yard gates without the price, weight, or installation headache, this is one of those clever yard projects that really surprises people. The basic idea is simple: pool noodles become the shaped “iron” bars, and black-tinted mortar gives everything that aged, sturdy, vintage look from the street. It’s budget-friendly, dramatic, and a fun weekend build if you like projects that make your entry feel more special.
I love projects like this because they give a home a lot of personality without requiring fancy tools or a contractor. As a parent, I’m always thinking about curb appeal in a practical way too, and this one is especially nice for anyone who wants decorative gates for a front walkway or garden entry that read beautifully from a distance. This tutorial makes a pair of lightweight faux-iron style front yard gates using 40 pool noodles total, finished in black mortar for that classic look.
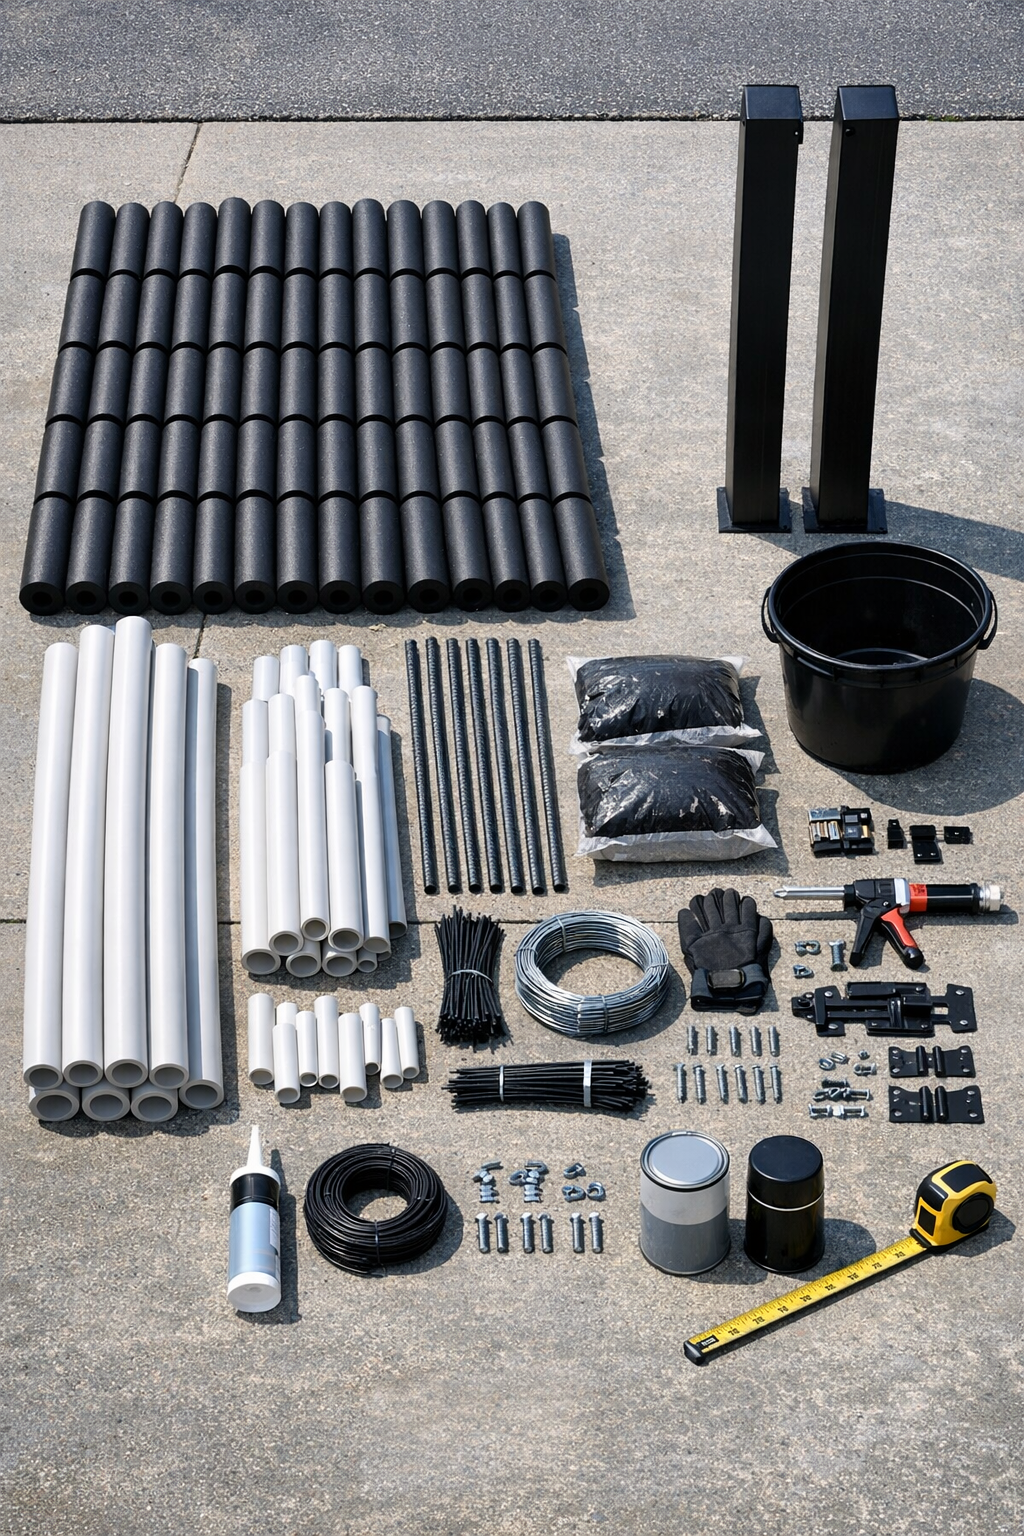
Materials
Instructions
1. Measure your front walkway opening and decide on the finished gate size; a pair of gates that are each 36 inches wide by 48 inches tall works well for most front yard entries. Sketch a simple vintage iron pattern with straight bars and a few gentle top curves so the design stays believable and easy to build.
2. Set the two 4x4 posts in the ground with fast-setting concrete, spacing them to allow your two gates plus a 1-inch center gap. Let the posts cure fully and check that both are plumb before building the gate panels.
3. On the plywood template board, draw one full gate panel to size and mark the outer frame, vertical bars, and decorative curves. Use jute rope or flexible cord taped in place to help shape smooth arching lines before tracing them.
4. Cut the pool noodles for the first gate: two 48-inch side pieces, two 36-inch top and bottom pieces, and enough inner bars and curved accents to complete your design using about 20 noodles total per gate. Keep the cuts clean and square so the finished panel looks more like metalwork and less homemade.
5. Slide PVC pipe inside the long outer-frame noodle pieces and the main crosspieces to stiffen them. Insert short lengths of rebar into selected vertical bars and lower sections so the panel has a little weight and stays straight once coated.
6. Assemble the noodle pieces directly on the template, securing joints with construction adhesive, galvanized wire, and black zip ties. Pull everything snug, and place the zip ties on the back side of the panel whenever possible so the front stays smoother.
7. Build the second gate panel to mirror the first, checking that both gates match in height and pattern. Dry-fit them side by side before coating so you can correct any uneven spacing now.
8. Cover your work surface with plastic sheeting and mix the black mortar to a thick peanut-butter consistency. If your mortar is not already black, stir in the black colorant thoroughly so the coating dries an even deep charcoal to black.
9. Apply a thin scratch coat of black mortar over every visible surface of the first gate panel, pressing it gently into the foam and around the wire-wrapped joints. Let that first coat set until firm enough to hold its shape without slumping.
10. Add a second coat to build the rounded “iron bar” look, smoothing the long bars and slightly tapering decorative curls and top details. Patch over tie locations and seams so the shapes read as one continuous piece.
11. Coat the second gate the same way, then let both panels cure flat and undisturbed for 24 to 48 hours, depending on weather. If the day is hot and windy, mist very lightly once or twice so the mortar does not dry too fast and crack.
12. Once cured, sand or scrape away any rough blobs, then apply bonding primer over the mortar surface. When the primer dries, paint both gates with matte black exterior paint to unify the finish and deepen the faux-iron effect.
13. Seal the painted gates with a matte exterior sealer and let them dry completely. This extra layer helps the finish hold up better through rain, sprinklers, and changing seasons.
14. Attach the strap hinges to each gate panel by fastening through reinforced frame areas where the PVC runs inside, then mount the gates to the posts. Install the latch, check the swing, and adjust the center gap so the pair closes neatly.
Variations & Tips
For a more antique look: Dry-brush a tiny amount of dark bronze or gunmetal paint over the raised areas after the black coat dries. I use a very light hand here, just enough to catch the texture and make it feel old.
For picky visual tastes: If someone in your family likes clean lines more than ornate scrollwork, skip the curls and make a simple spear-top or straight-bar design. It still gives that vintage gate feel without looking too fussy.
For better durability: Keep the gates decorative and lightweight rather than treating them like security gates. The PVC and rebar help, but these hold up best when they are opened gently and not climbed on.
For easier shaping: Warm pool noodles in the sun for 15 to 20 minutes before bending them into curves. That little trick makes them easier to coax into graceful shapes without fighting the foam.
For wet climates: Add an extra coat of sealer once the gates are fully installed and cured. I’d also touch up chips quickly, especially near the bottom edges where moisture tends to linger.
For a lower-cost version: Make a single pedestrian gate instead of a double gate and use the same method on a smaller scale. It still creates a lovely focal point by the walkway and uses fewer materials.
For a polished finish: Stand back at the curb before the final paint coat and look for bars that seem too thick or uneven. A little scraping and smoothing at that stage makes a big difference in helping the finished project read like iron from a distance.