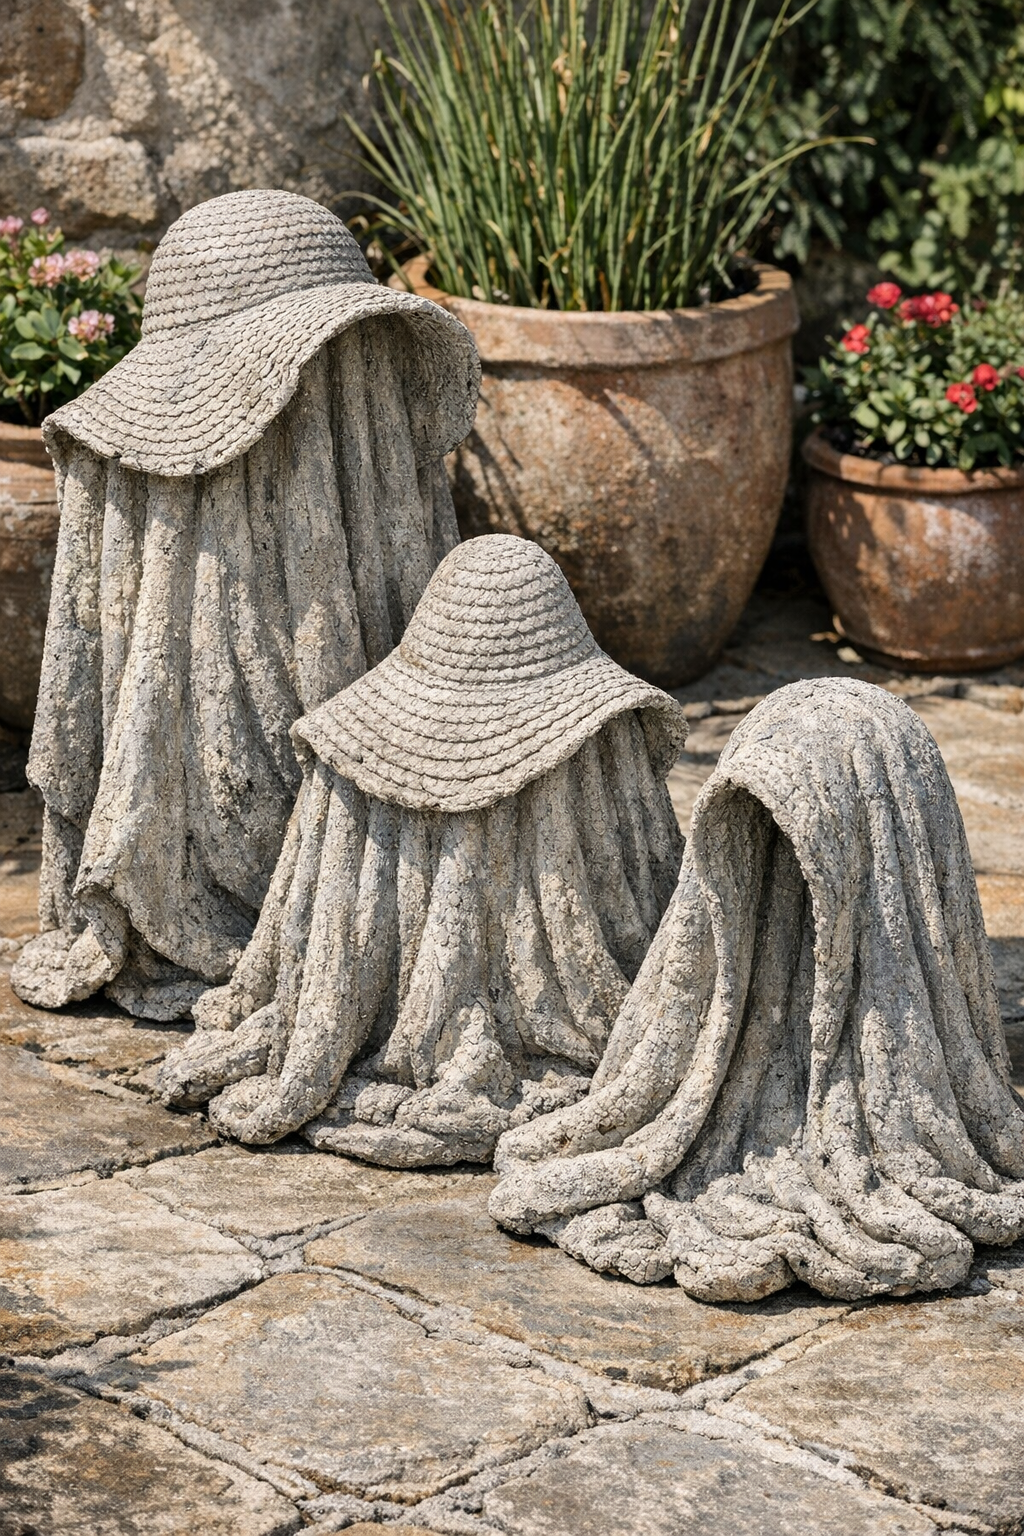
There’s something especially satisfying about turning a few humble, inexpensive things into garden décor that looks like it has been sitting in a lovely old courtyard for years. In this project, I use woven straw sun hats, cement, and two simple support items to create heavy draped patio forms that look a bit like gathered stone fabric or weathered garden sculptures. They’re sturdy, unusual, and just right for adding character to a porch, patio, or tucked-away flower bed.
I’m fond of projects like this because they remind me of the old Midwestern habit of making do with what you have and making it beautiful besides. If you enjoy concrete crafts, outdoor décor, or simply want a statement piece without spending much, this is a fine weekend project. The process is straightforward, but the results look far fancier than the effort might suggest.

Materials
3 woven straw sun hats, adult size, about 16 to 18 inches across
Instructions
1. Set up your work area outdoors or in a well-ventilated spot, and spread out the plastic drop cloth on a flat surface. Place your three upside-down buckets or pots several inches apart so each hat will have room to drape.
2. Rub a thin coat of cooking oil or petroleum jelly over the outside of each bucket or pot. This helps the cured cement release more easily later on.
3. Put on your gloves and pour the cement mix into your mixing tub. Add water a little at a time and stir until you have a smooth, thick mixture about like oatmeal or brownie batter, wet enough to soak into the straw but not runny.
4. Dip the first straw hat into the cement mixture and press it down so the fibers absorb the slurry well. Lift it out and use your gloved hands or trowel to spread extra cement over the entire hat, coating both the crown and brim.
5. Center the coated hat over one upside-down bucket or pot and gently arrange the brim into soft folds and drapes. Don’t fuss too much; the natural unevenness is what gives these forms their old-world charm.
6. Repeat the coating and draping process with the remaining two hats, making each one a little different in shape. If any spots look thin, pat on more cement so the hats are well covered and structurally strong.
7. Let the draped forms sit undisturbed for 24 hours or until they feel firm and hold their shape. If the weather is hot and dry, lightly mist them once or twice so the cement cures more evenly instead of drying too fast.
8. Carefully lift each hardened piece off its support and turn it upright to inspect it. If you find rough edges or fragile thin areas, mix a small amount of cement and patch them, then let the repairs cure another 12 to 24 hours.
9. Allow the finished forms to cure fully for another 2 to 3 days before placing them outdoors permanently. Once cured, set them on the patio as sculptural accents, use them as low garden risers, or group all three together for a more dramatic display.
Variations & Tips
Different heights: Use supports of slightly different sizes so the three forms don’t all sit at the same height. I find a grouped arrangement looks more natural and collected that way.
More dramatic folds: For deeper draping, choose hats with wider brims and soften the brim into larger bends before the cement begins to set. Work gently so you don’t crack the wet coating.
Weathered finish: After full curing, you can dry-brush a little outdoor gray, moss, or stone-colored paint over the surface for an aged garden look. It gives the pieces the kind of timeworn character I’ve always loved in old farmstead ornaments.
Use as bases: These forms can serve as little display stands for lanterns, small pots, or seasonal porch decorations, as long as the weight is balanced. I’d avoid anything too heavy until you know how thick and sturdy your pieces cured.
Cement consistency: If your mixture is too thin, it will slide right off the hat; if it’s too thick, it won’t soak in properly. Aim for a thick but spreadable mix, and add water very slowly.
Cold-weather note: If temperatures are low, bring the project into a protected garage or shed while it cures. Cement sets best when it isn’t exposed to frost or heavy rain.